Congratulations on your new bicycle purchase!
Assembling your bike may seem daunting at first, but with careful guidance and attention to safety, you'll be riding in no time. Follow this step-by-step guide to ensure a smooth and safe assembly process.
Get Started with Assembling
Preparation
Before you begin assembling your bicycle, gather the necessary tools and equipment:
- Allen keys (typically 4mm, 5mm sizes)
- Multi Spanner
- Safety gear (gloves, protective eyewear)
- Screwdrivers (Phillips and flathead) - Optional
Unboxing and Inspection
Carefully unpack the bicycle and its components. Avoid Sharp knife for unboxing and ensure to wear gloves if possible.
Wheel Installation
Insert the front wheel into the fork dropouts, ensuring it's fully seated.
Tighten the quick-release skewer or axle nuts
Handle Bar Installation
Attach the handlebars to the stem, aligning them with the front wheel.
Tighten the handlebar clamp bolts evenly to secure the handlebars in place.
Component Installation
Install the seatpost into the seat tube, adjusting the height to your preference and tightening the seat clamp.
Attach the saddle to the seatpost, ensuring it's level and securely tightened.
Install the pedals, remembering that the right pedal (R) screws in clockwise and the left pedal (L) screws in counterclockwise.
Install any additional components such as fenders, racks, or accessories according to your Preferred position
Safety Checks
Double-check all bolts and fasteners to ensure they are properly tightened.
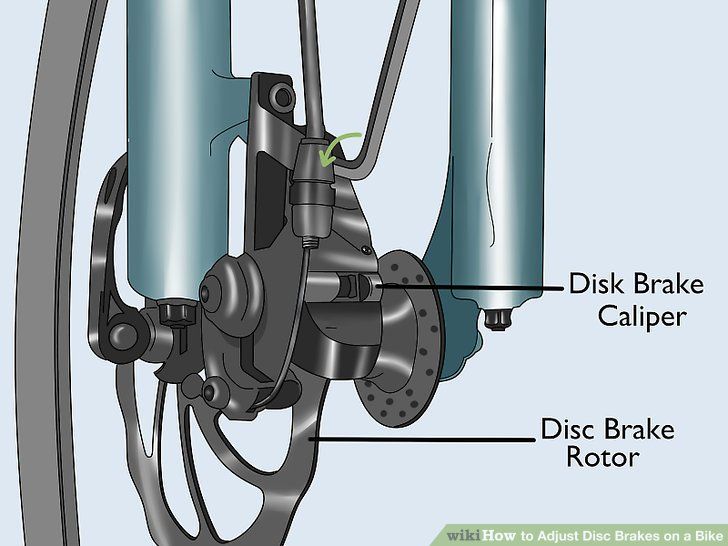
Inspect the brakes, ensuring they are adjusted and aligned correctly.
Check the tire pressure using a bicycle pump, inflating them by pressing the tyre. (Using Machine PSI values is not Recommended as it might not be accurate at shops).
Conduct a final visual inspection of the entire bicycle to ensure everything is fitted.
Safety Measures
Wear appropriate safety gear throughout the assembly process, including gloves and protective eyewear.
Take breaks as needed to prevent fatigue and maintain focus.
If you encounter any difficulties or uncertainties during assembly, check with the video tutorials provided below.
Conclusion:
By following these step-by-step instructions and prioritizing safety measures, you can confidently assemble your bicycle purchased online. Remember to take your time, double-check your work, and enjoy the satisfaction of riding your newly assembled bike!
Quick Overview
Want to know how to assemble your online purchased bicycle parts? Read the following steps to get started.
Step 1: Preparation
Before starting the assembly, make sure you have all the parts you need. Check the packaging and look for the fitting tools like Multi Spanner & Alen Keys.
%20(1)_aGs9rzfvH9.png?updatedAt=1715445183603)
Step 2: Frame Assembly
Assemble the frame by attaching the seatpost to the downtube. Use the Seat Clamp to secure the seatpost and downtube.
_kLN5X5YwW.jpg?updatedAt=1715446894325)
Step 3: Wheel Assembly
Attach the rim to the hub by screwing them together. Add the front wheel to the cycle and tight the wheel. Make sure to keep the alignment in center.

Step 4: Brake Assembly
Make sure the Disc plate stays at the center of the disk machine.

Step 5: Final Touches
Mount the handlebars to the frame and attach the seat. Add any additional components like fenders, lights, or a bell.
%20(1)_n-4W2Li11T.png?updatedAt=1715447546496)
Related videos
Accessories You may need

Premium Seat
Enjoy Comfortable Bicycle Riding with Premium Seat
₹ 800

Bottle Holder
Keep Your Bottle Safe and Handy with Bottle Holder
₹ 390

Alloy Carrier
An Adjustable Bicycle Luggage Carrier